How Do I Add Networked Cameras to an Imperial NVR?
In this guide we will cover how to add network cameras to an Imperial NVR by way of its private LAN port, which will keep the cameras and their video data off of your network.
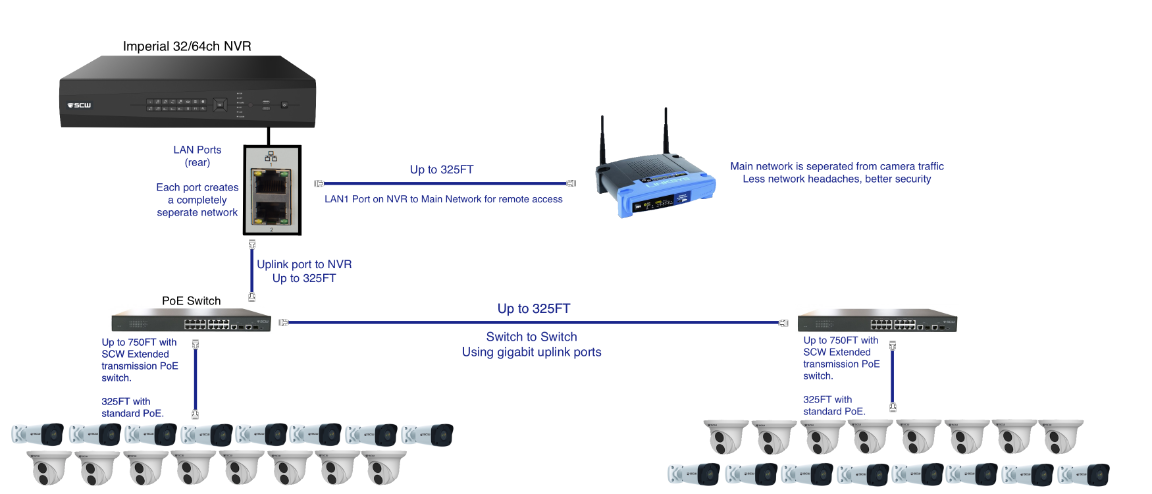
Please refer to the image below to get an idea of how to install the cameras properly before following the steps.
PART 1: Setting up the NVR network configuration
Once you have the cameras connected to the NVR, we’ll want to choose a LAN port that will handle the camera network.
By default, the Imperial NVR will have its Default Route* set to LAN 1 in the Network Setup tab.
*The Default Route is the primary LAN port that the NVR will use to access the internet.
The LAN 2 port is intended to be for the camera network uplink. (connected to external switch, with cameras connected to it)
The intended method of connection will be to hook your POE switches for cameras into LAN 2, and we will assume that in this guide.
We will cover configuring from both the NVR directly and the Web portal, which will be indicated below.
With your cameras connected to POE switches (then connected to LAN 2), the next step is to decide a network range for LAN 2.
From the NVR:
NVR - Configure from the local monitor: with your connected mouse, right-click the screen and go into Menu. Now log into your system with the username and password. (If this is default still, username will be admin and password will be 12345scw), navigate into the Network settings on the left column. (This will have a globe symbol above the text.)
Here, you’ll need to Select NIC at the top of this configuration page. Select NIC2 with the dropdown menu.
By default, the NVR should produce a 192.168.2.30 as its NIC2 IPv4 address, and the IPv4 Default Gateway should be 192.168.2.1.
As long as this network range is not the same as the network that is plugging into LAN 1, it will be ok to leave it configured this way.
LAN1 and LAN2 can NOT be on the same “range”.
From the Web Interface:
Web - Configure from the Web Interface: You can now access the system by way of its IP address through the LAN 1 ip address connection that you set from the NVR interface (again, if you didn't customize this, the IPv4 Default Gateway should be 192.168.2.1IPv4 LAN 1 address into your Internet Explorer URL bar at the top. Example: http://192.168.1.210
Once the page loads, you’ll go into Setup at the top, then Network on the left column.
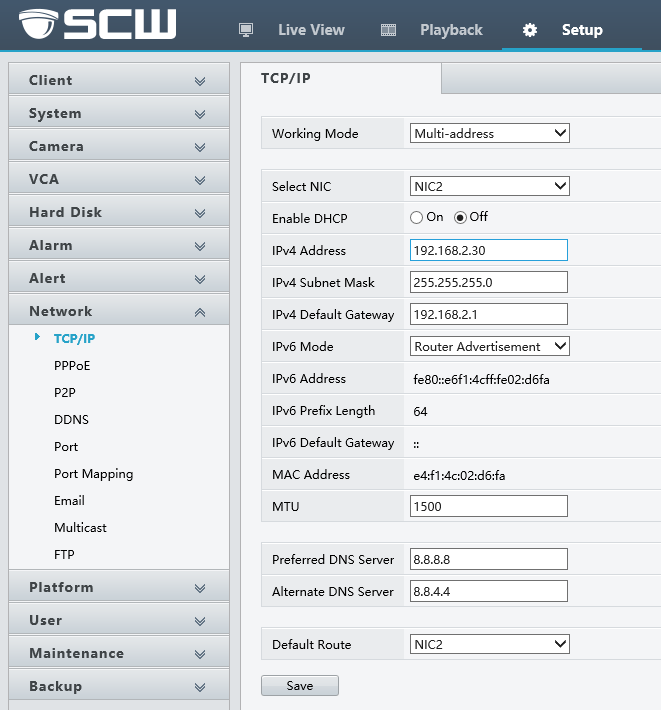
Under TCP/IP you’ll find the option to select NIC2 from the dropdown menu.
Verify that you’ve got 192.168.2.30 as the IPv4 address, and 192.168.2.1 as the IPv4 Default Gateway. Here is an image with an example of what this will look like in the web interface.
Now that we’ve got the proper IP scheme set to NIC2, it’s time to add your cameras to the NVR.
(Note: the default IP address for your cameras is 192.168.1.13. The NVR will assign IP’s to the cameras as they are added by adding one to each iteration: 192.168.1.13 then 192.168.1.14 and so on...)
PART 2: Adding Cameras to the NVR
From the NVR:
NVR - Configure on the monitor directly: Right-click on the screen and enter the Menu. You’ll navigate to Camera on the left, and here you should see your cameras listed on the screen.
The Imperial NVR automatically searches over the networks it’s connected to to find any cameras that are online.
Once you verify that the proper number of cameras are showing up, select the Add All button at the top, to add all selected cameras. The NVR will automatically assign cameras IP addresses based on the info we’ve already put in, so they will end up in the 192.168.2.x range.
From the Web Interface:
Web - Configure from the Web Interface: Through a web browser, log into your system and go to Setup at the top, then Camera on the left.
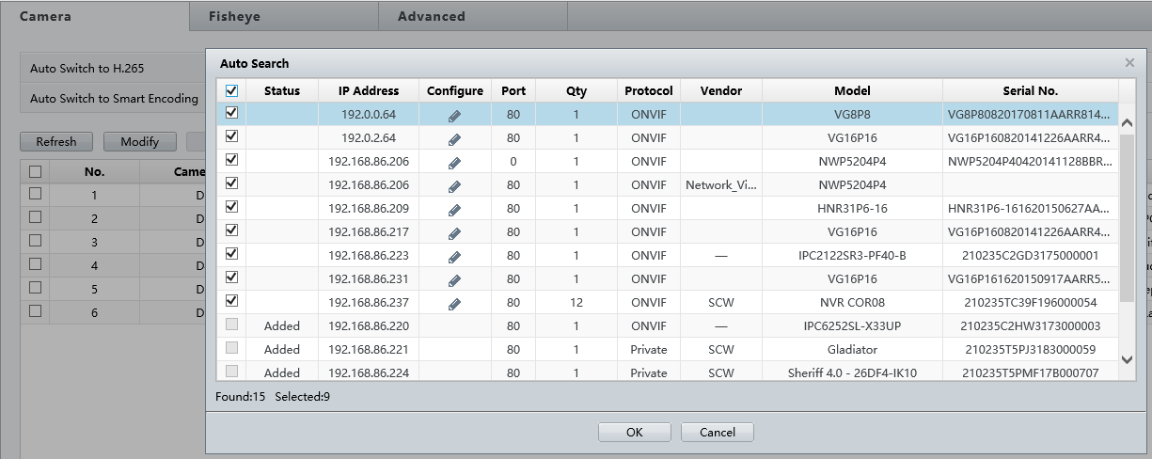
Under Camera beneath the main camera menu, you will need to select the Auto Search option on this page to see the cameras that are online. It will search the same way here as it does on the monitor directly.
Check the box in the top left corner to select all cameras that are on this list, then hit OK at the bottom to add them to the NVR. It will look similar to the image below.
You will now see the cameras online in the camera table (the cameras may take a moment to fully connect)
The added cameras should now show up on the live view, this is another method to confirm the cameras have been added successfully.
Optional: If you would like to set the IPs of the cameras manually into the NIC2 range that you’ve decided on: (in our example, the 192.168.2.x range)
From the Local Monitor:
Under the Net Config option when you’re within the Camera settings in the menu.
From the Web Interface:
On the Auto Search screen mentioned above, you’ll use the Pencil icon under the Configure Column to change the IP information manually. The username and password for cameras by default is admin and 123456, respectively.
(If you have for any reason, changed the camera’s default username and password - the correct credentials must be entered in this menu, in order to successfully save the changes)
(The Admiral system may only implement changes to cameras through this menu with like brands. If you have connected a 3rd party manufacturers camera - or connected an earlier model SCW non-admiral line camera, the settings may not successfully push to the camera. If this is the case, changes to camera IP’s must be done at the camera level, and not through the NVR itself)
Note: It’s a good idea to create a spreadsheet with the information about your network and cameras. Information such as: Camera Port (the camera’s location within the NVR’s camera list) / Camera IPv4 / Camera Name / Camera Location / Serial Number / Username / Password and any other information you may want or need to make future troubleshooting run smooth.